
In this post, we discuss how to configure an high availability with automatic failover of SAMBA on UBUNTU instances into Oracle OCI.
This solution is a robust and reliable file server infrastructure, leveraging the power of a clustered SMB setup and completly license free. The cost is related only to the consumption (oCPU and Block Volume size).
The benefits of implementing a clustered SMB file server service into your organization are multiple:
- Reliability: The clustered configuration ensures high availability, minimizing the risk of downtime and ensuring constant access to critical files.
- Fault Tolerance: In the event of a server failure, the clustered setup provides automatic failover, guaranteeing uninterrupted access to files and maintaining business continuity.
- Resource Utilization: Efficient resource allocation ensures optimal utilization of server resources, maximizing productivity while minimizing operational costs.
- Implementing a clustered SMB file server is a strategic move towards creating a resilient, highperformance IT environment tailored to meet the evolving needs of your business.
Objective
Provide a reliable file server in HA supporting SMB protocol integrated with Windows Active Directory
Prerequisites
- Access to an Oracle Cloud Tenancy.
- Two linux Ubuntu VMs
- One Block Volumes
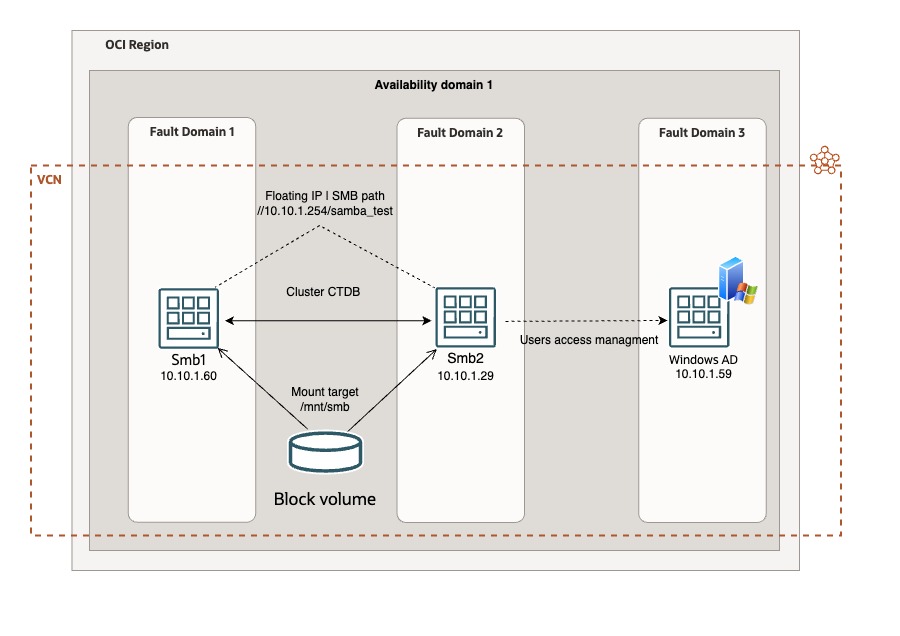
Architecture
Environment set up
- Create 2 UBUNTU 22.04 instances.
- Create on both instances the folder where you will allocate your files and set up the SAMBA server (ex: /mnt/smb)
- Create a Block Volume with the required size for your SMB datastore, and attach it to both instances (ISCSI, read/write – sharable)
- Note the dev name assigned to the Block Volume attached (sudo lsblk)
- Assign a secondary private ip adress on the first node. This is your floating ip address. (ex: 10.10.1.254)
- Add to /etc/hosts on both UBUNTU instances all the ip addresses and name of your hosts included the Windows Active Directory server that you will use to authenticate the users (ex: 10.10.1.60 smb1, 10.10.1.29 smb2 10.10.1.59 ad.testad.oci testad.oci AD)
- Configure on both UBUNTU instances the IPTABLES accordly to your needs (The iptables are preconfigured on our Ubuntu instances; The 6TH rule into INPUT section reject evertyhtings else, so you can delete it or add all allowed protocols and ports before it)
- Install the OCI CLI and configure it (configuration command: oci setup config) on both UBUNTU instances. (Install it into /usr/bin or your user path to avoid permission problem. Default it is root)
OCFS2 configuration
bash -c "$(curl -L https://raw.githubusercontent.com/oracle/ocicli/master/scripts/install/install.sh)"The Oracle Cluster File System (OCFS, in its second version OCFS2) is a shared disk file system developed by Oracle Corporation and released under the GNU General Public License.
To manage a shared writeble Block Volume we have to deploy OCFS2.
Execute on both nodes: sudo apt-get install ocfs2-tools -y
Into /etc/default/o2cb change the value of O2CB_ENABLED from false to true
O2CB_ENABLED=trueInto /etc/ocfs2/cluster.conf (take care of indentation and format of the file)
 cluster:
     name = ocfs2
     heartbeat_mode = local
     node_count = 2
 node:
     cluster = ocfs2
     number = 0
     ip_port = 7777
     ip_address = 10.10.1.60
     name = smb1
 node:
     cluster = ocfs2
     number = 1
     ip_port = 7777
     ip_address = 10.10.1.29
     name = smb2
Now we can start the o2cb service
sudo /etc/init.d/o2cb startFormat the Block Volume device with ocfs2 file system (the path of the device that we note before on point 4). Execute this command only on 1 node.
sudo mkfs.ocfs2 "MyOCFS2Cluster" /dev/sd*Cluster registration
sudo o2cb register-cluster ocfs2Finally mount the Block Volume on the directory assigned for SAMBA server (ex: /mnt/smb)
sudo mount /dev/sd* /mnt/smbCheck the cluster status with:
sudo o2cb list-nodes ocfs2Enable the services:
sudo systemctl enable o2cb
sudo systemctl enable ocfs2
Update the FSTAB (/etc/fstab) to mount the Block Volume automatically at startup (adjust the /dev/sd* device accordingly with your dev name) :
/dev/sd* /mnt/smb ocfs2 _netdev,defaults 0 0SAMBA cluster set up
Samba allows file and print sharing between computers running Microsoft Windows and computers running Unix. It is an implementation of dozens of services and a dozen protocols, including: NetBIOS over TCP/IP (NBT) SMB (known as CIFS in some versions). Now we will set up SAMBA and CTDB on both nodes:
sudo apt-get install ctdb samba samba-common winbind smbclient -yEdit the samba configuration file
sudo nano /etc/samba/smb.confand copy and paste the following parameters (You have to configure it accordingly with your environment and windows domain/workgroup. Netbios name parameter has to be the same for all your nodes):
[global]
        server string = samba_server
        workgroup = TESTAD
        password server = ad.testad.oci
        realm = testad.oci
        winbind enum groups = yes
        winbind enum users = yes
        winbind use default domain = yes
        security = ADS
        debuglevel = 2
        wins support = no
        idmap config TESTAD : backend = rid
        idmap config TESTAD : range = 10000 - 50000
        idmap config * : backend = tdb
        idmap config * : range = 1000-9999
        template shell = /bin/false
        winbind offline logon = false
        interfaces = lo ens3
        clustering = yes
        guest ok = yes
        bind interfaces only = no
        disable netbios = no
        netbios name = sambacluster1
        smb ports = 445
        log file = /var/log/samba/smb.log
        max log size = 10000
        veto files = /._*/.DS_Store/.Trashes/.TemporaryItems/
        delete veto files = yes
        nt acl support = yes
        inherit acls = yes
        map acl inherit = yes
        map archive = yes
        map hidden = yes
        map read only = yes
        map system = yes
        store dos attributes = yes
        inherit permissions = yes
        unix extensions = no
[samba_test]
        path = /mnt/smb
        browseable = yes
        writeable = yes
        read only = no
        public = yes
        inherit acls = no
        admin users = "testad.oci\administrator"
        create mask = 0744
        directory mask = 0755
Edit the CTDB configuration file, to set up the cluster.
sudo nano /etc/ctdb/ctdb.confand copy and paste the following parameters:
CTDB_NODES=/etc/ctdb/nodes
CTDB_PUBLIC_ADDRESSES=/etc/ctdb/public_addresses
CTDB_RECOVERY_LOCK="/mnt/Samba/ctdb/.ctdb.lock"
CTDB_MANAGES_SAMBA=yes
CTDB_MANAGES_WINBIND=yes
CTDB_SERVICE_SMB=smbd
Edit the nodes configuration file for configuring the cluster
sudo nano /etc/ctdb/nodesand add the ip addresses of your nodes:
10.10.1.60
10.10.1.29
Edit the ctdb public address configuration file (the floating ip address)
Sudo nano /etc/ctdb/public_addressesadd your floating ip address:
10.10.1.254/0 ens3Now we have to add the script to manage the floating ip address at the OCI level and migrate it automatically in case of failover.
Sudo nano /etc/ctdb/functionsAdd the following code AFTER “add_ip_to_iface ()” section. (Change the OCID and the host name with YOUR nodes NICs OCID and the host name :
##### OCI vNIC variables
    server="`hostname -s`"
    smb1vnic="ocid1.vnic.oc1.eu-frankfurt-1.YOUR_NODE1_VNIC_OCID"
    smb2vnic="ocid1.vnic.oc1.eu-frankfurt-1.YOUR_NODE2_VNIC_OCID"     vnicip="10.10.1.254"
    #export LC_ALL=C.UTF-8
    #export LANG=C.UTF-8
    #touch /tmp/vip.log
    ##### OCI/IPaddr Integration
       if [ $server = "smb1" ]; then
          /usr/bin/oci network vnic assign-private-ip --unassign-if-already-assigned --vnic-id $smb1vnic --ip-address $vnicip 2>/dev/null
       else
          /usr/bin/oci network vnic assign-private-ip --unassign-if-already-assigned --vnic-id $smb2vnic --ip-address $vnicip 2>/dev/null
       fi
Use this command to troubleshoot the floating IP migration if it does not works.
sudo journalctl -u ctdb.serviceActive Directory integration
To integrate the users access with you windows active directory server, we have to install KERBEROS on both nodes:
sudo apt -y install winbind libpam-winbind libnss-winbind krb5-config samba-dsdb-modules samba-vfs-modulesand configure it:
sudo nano /etc/krb5.confCheck the configuration with the following (Remember to use the Windows domain/realm configured in your environment):
[libdefaults]
        default_realm = TESTAD.OCI
# The following krb5.conf variables are only for MIT Kerberos.
        kdc_timesync = 1
        ccache_type = 4
        forwardable = true
        proxiable = true
# The following encryption type specification will be used by MIT Kerberos
# if uncommented.  In general, the defaults in the MIT Kerberos code are # correct and overriding these specifications only serves to disable new # encryption types as they are added, creating interoperability problems.
#
# The only time when you might need to uncomment these lines and change
# the enctypes is if you have local software that will break on ticket
# caches containing ticket encryption types it doesn't know about (such as # old versions of Sun Java).
#       default_tgs_enctypes = des3-hmac-sha1
#       default_tkt_enctypes = des3-hmac-sha1
#       permitted_enctypes = des3-hmac-sha1
# The following libdefaults parameters are only for Heimdal Kerberos.         fcc-mit-ticketflags = true
[realms]
        TESTAD.OCI = {
                kdc = ad.testad.oci
                admin_server = ad.testad.oci
The last step is join your hosts (both) into the windows domain:
Sudo net ads join -U Administrator -S testad.ociNow, try to connect your client to the Samba server using the floating IP address and Windows Active Directory users (for example: //10.10.1.254/samba_test) and test the business continuity if one nodes is shutdown or restarted.
Enjoy your brand new SAMBA cluster!
Related Links
- CTDB
- OCFS2
- Original published on OCI learn tutorial