
Introduction
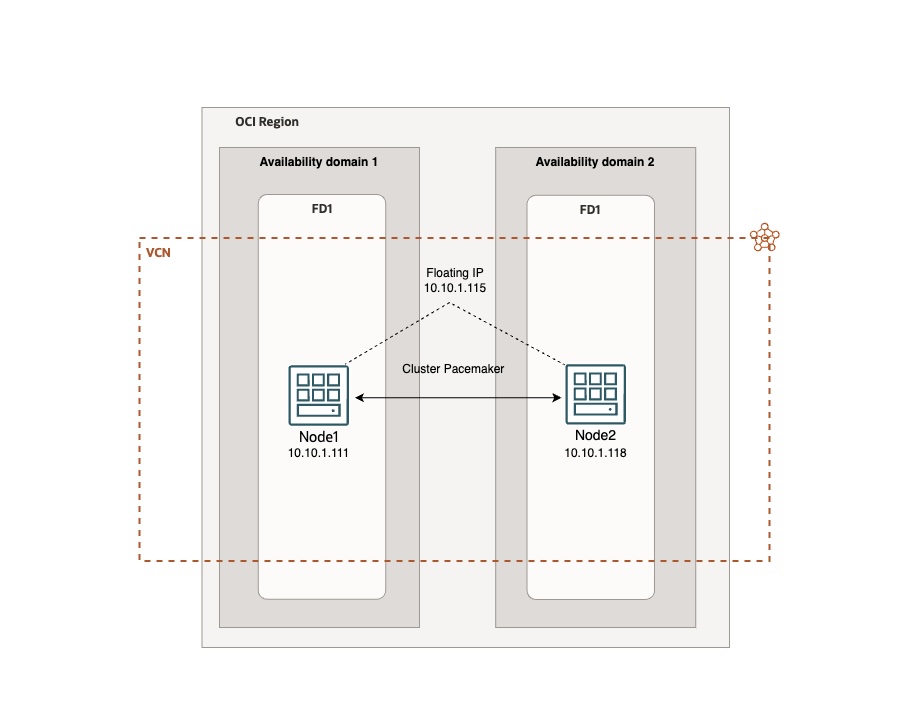
In many environments, it is still essential to use infrastructures with an active/passive Linux cluster, which require the use of IP floating. In cloud infrastructures, the secondary IP address must be managed not only by the operating system but also by the cloud infrastructure.
In this tutorial, we will see how the IP floating of a Linux cluster can be managed as an integrated resource by Pacemaker, in a simple manner and without custom code, as seen in several blog posts (Oracle blog here and here).
Architecture design
Objective
- Deploy a reliable UBUNTU linux cluster Active/Passive in HA with the OCI IP floating directly managed by pacemaker.
Prerequisites
- Access to an OCI tenancy.
- Two compute instances with Linux image installed (Ubuntu).
- OCI CLI installed: Follow the instructions here.
- jq installed.
- Secondary private IP address on the compute instances configured on node1: Refer to the guide here.
- OCI Dynamic group with a policy attached: Refer to the guide here. The policy must include the statement:
allow dynamic-group <GROUP_NAME> to use virtual-network-family in compartment id <COMPARTMENT_ID>.
- Additional OCIVIP resource for Pacemaker: Refer to the OCIVIP resource agent on GitHub.
Task 1: Set up the Environment
- Launch two compute instances, selecting Ubuntu 22 as the operating system for each instance.
- Assign a Secondary Private IP to “node1”. Follow the instructions here to assign a secondary private IP address to the VNIC of “node1”. This will be the IP FLoating. ex:
10.10.1.115. - Create a Dynamic Group ‘OCIVIP’.
- Log in to the OCI web console.
- Navigate to Identity & Security > Dynamic Groups.
- Click Create Dynamic Group.
- Name the group “OCIVIP”.
- Add the following rule to include instances in the specified compartment:
All {instance.compartment.id = 'Your compartment OCI ID'}
- Add a Policy ‘OCIVIP_policy’ to the Dynamic Group.
- Navigate to Identity & Security > Policies in the OCI console.
- Click Create Policy.
- Name the policy “OCIVIP_policy”.
- Add the following statement to allow the dynamic group to use the virtual network family:
allow dynamic-group OracleIdentityCloudService/OCIVIP to use virtual-network-family in compartment id 'Your compartment OCI ID'
Task 2: Configure the cluster and the IP Floating.
After that the environment is set up, you can proceed with configuring Pacemaker and integrating the OCIVIP resource agent. Here’s an overview of what you’ll do next:.
Connect to your instances via SSH and proceed with the cluster installation by performing the following operations on both nodes up to and including point ’13’.
- Update the OS:
sudo apt updatesudo apt upgrade
- Install the OCI CLI and Verify its Functionality. Documentation.
bash -c "$(curl -L https://raw.githubusercontent.com/oracle/oci-cli/master/scripts/install/install.sh)"- Setup the OCI CLI
oci setup config - Verify the OCI CLI installation:
oci os ns get
- For a test environment, you can remove the ‘reject’ rule at line 6 in the INPUT section of iptables, and then make it persistent to allow instance communication (Remember to configure iptables securely and appropriately in production environments).
sudo iptables -D INPUT 6sudo susudo iptables-save > /etc/iptables/rules.v4sudo ip6tables-save > /etc/iptables/rules.v6
- Update the /etc/hosts file with the private IP addresses assigned to your two instances. We will call them ‘node1’ and ‘node2’: Edit the file:
sudo nano /etc/hosts- Add your nodes name and ip addresses:
10.10.1.111 node1 10.10.1.118 node2
- Install the packages related to the cluster and don’t forget jq as well:
sudo apt install -y pacemaker corosync pcs jq
- Back up the corosync.conf file.
-
sudo cp /etc/corosync/corosync.conf /etc/corosync/corosync.conf.bk
-
- Edit the corosync.conf file:
sudo nano /etc/corosync/corosync.conf
- Download and copy the content of this file into the
corosync.conf - Add the resource that Pacemaker will use to manage OCI floating IP natively into the /usr/lib/ocf/resource.d/heartbeat/ directory. You can download the content of the file from this link (the resource was not developed by Oracle, but by third-party developers).
- Edit the ocivip file just downloaded and change the path of the OCI CLI executable in the OCF_RESKEY_ocicli_default variable with your OCI CLI path. If you kept the default path during the OCI CLI installation on Ubuntu, the variable will be:
OCF_RESKEY_ocicli_default="/home/ubuntu/bin/oci"
- Create the file and copy the code previously downloaded with the updated variable:
sudo nano /usr/lib/ocf/resource.d/heartbeat/ocivip- Change the permission and the owner of the file:
sudo chown root /usr/lib/ocf/resource.d/heartbeat/ocivipsudo chmod 755 /usr/lib/ocf/resource.d/heartbeat/ocivip
- Enable at boot and restart the services, as well as check that they are functioning correctly:
sudo systemctl enable corosyncsudo systemctl enable pacemakersudo systemctl enable pcsdsudo systemctl restart pcsdsudo systemctl restart corosyncsudo systemctl restart pacemakersudo systemctl status pcsdsudo systemctl status corosyncsudo systemctl status pacemaker
- Set the password for the user hacluster:
sudo passwd ocicluster
- Authenticate the nodes:
sudo pcs cluster auth node1 node2 -u ocicluster -p YOUR_PASSWORD
- Create the cluster:
sudo pcs cluster setup ha_cluster node1 node2
- Start and enable the cluster at boot on all nodes:
sudo pcs cluster start --all sudo pcs cluster enable --all
- Check that the cluster is active and functioning:
sudo pcs status
- Add the ‘OCIVIP’ resource for managing the floating IP (Remember to change the virtual IP address to the one assigned as secondary to your VNIC in step 2 of this tutorial):
sudo pcs resource create OCIVIP ocf:heartbeat:ocivip secondary_private_ip="10.10.1.115" cidr_netmask="24" op monitor timeout="30s" interval="20s" OCF_CHECK_LEVEL="0"
- Verify that the resource has been added correctly and is functioning:
sudo pcs status
- Verify that the secondary IP address can migrate between instances, for example by restarting node1, and check on the OCI web console that it is assigned to the other instance (and vice versa). Before restarting node1, you can also ping the floating address from a third VM and check that it continues to respond after node1 is shut down. A brief interruption of a few hops is normal.
Congratulations! Your active/passive cluster is up and running. You can now add the services that require business continuity.
Related Links
- Read all my previous posts on the official Oracle Blog
- OCI documentation
- OCI CLI installation
- OCI Dynamic Groups
- OCI seconday IP Address
- Ocivip Resource
- Published on Official Oracle Help Center website
Credits
- Thanks to Lorenzo Garuti to develops the ocivip resource